Reversal

Cut a sheet of your heavier paper in half. Fold that piece in half.
Open it up and on one side, draw a simple pattern or picture in black oil
pastel. Re-fold. Press firmly on the back of the paper with the back of a spoon
until you have transferred the image to the other side of the paper. Use the
black pastel to firm up the drawing. Now choose different colour
combinations for each side, for example, warm on one side, cool on the other,
or complementary colours – one on each side
Simplification

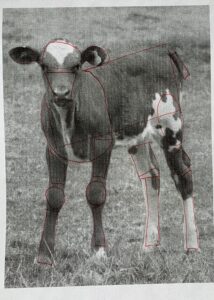
Think of an animal you want to draw. On half a piece of your heavier paper, draw it from your imagination don’t worry if it looks bad – that is part of the strategy. Google ‘Fair Use’ and find a photograph of an animal. There is an example on the next slide. Print the picture in black and white. Use your Crayola felt pens to search out and draw geometric shapes as you see
them on the animal. Now looking at your picture with shapes, draw this animal on the other side of your paper starting with drawing the shapes first. Leave the shapes visible on your final drawing so we can see how simplification helped you.
Image Development Strategies: which are best for which grades?
Start with more simple ones for younger students – these strategies start in the curriculum at Grade 3.
Grades 3 – 4:
Magnification, Multiplication, Reversal, Elaboration, Simplification
Grades 5 – 6:
Substitution, Abstraction, Reproduction, Point of view, Exaggeration,
Serialisation, Distortion
Grades 7 – 8:
Superimposition, Stylization, Animation, Juxtaposition, Metamorphosis,
Disguise, Isolation
Image Development Strategy Lesson Planner